Install PAM Jump Server
JumpCloud Privileged Access Management (PAM) uses a hybrid model. Part of PAM runs in the JumpCloud cloud. A Jump Server runs on a Linux host in your environment.
The Jump Server is the on-premises proxy for privileged sessions to Servers, Databases, and Privileged Websites with Web Shield. It can record sessions when recording is enabled, and it can support Jump Server backup features configured in PAM Settings.
This article explains what a Jump Server does, what you need before install, how to register a Jump Server in the JumpCloud Admin Portal, how to download and run the install file on the Linux host, and how to verify the connection.
Prerequisites
- One Linux host that will run the Jump Server containers. Operating system: Ubuntu Server 24.04.
- Docker installed and running on that host before you execute the Jump Server install file.
- Root privileges on the host (sudo su or equivalent). The install must run as root.
- At least 2 vCPUs.
- At least 8 GB RAM.
- At least 80 GB free on /. Provision more than 80 GB total so the OS and system files still leave 80 GB free on /.
- curl available on the host.
- Host clock drifts under 300 seconds versus JumpCloud server time.
- Network rules that allow inbound access to the Jump Server Web Port and Shell Port, and outbound access to JumpCloud PAM Platform endpoints for your data center and to your target resources.
Considerations
- Incomplete host, Docker, or network configuration is the most common reason install fails, or the Jump Server reports Online but cannot serve sessions.
- You need a Jump Server with status Online for Servers, Databases, and Privileged Websites with Web Shield. Privileged Websites without Web Shield use JumpCloud Go in the user's browser and do not use the Jump Server for that session path.
- Installing or reinstalling a Jump Server can take about 10 to 20 minutes. Privileged access through that Jump Server is unavailable while the install runs.
Understanding Jump Servers and Secure Access
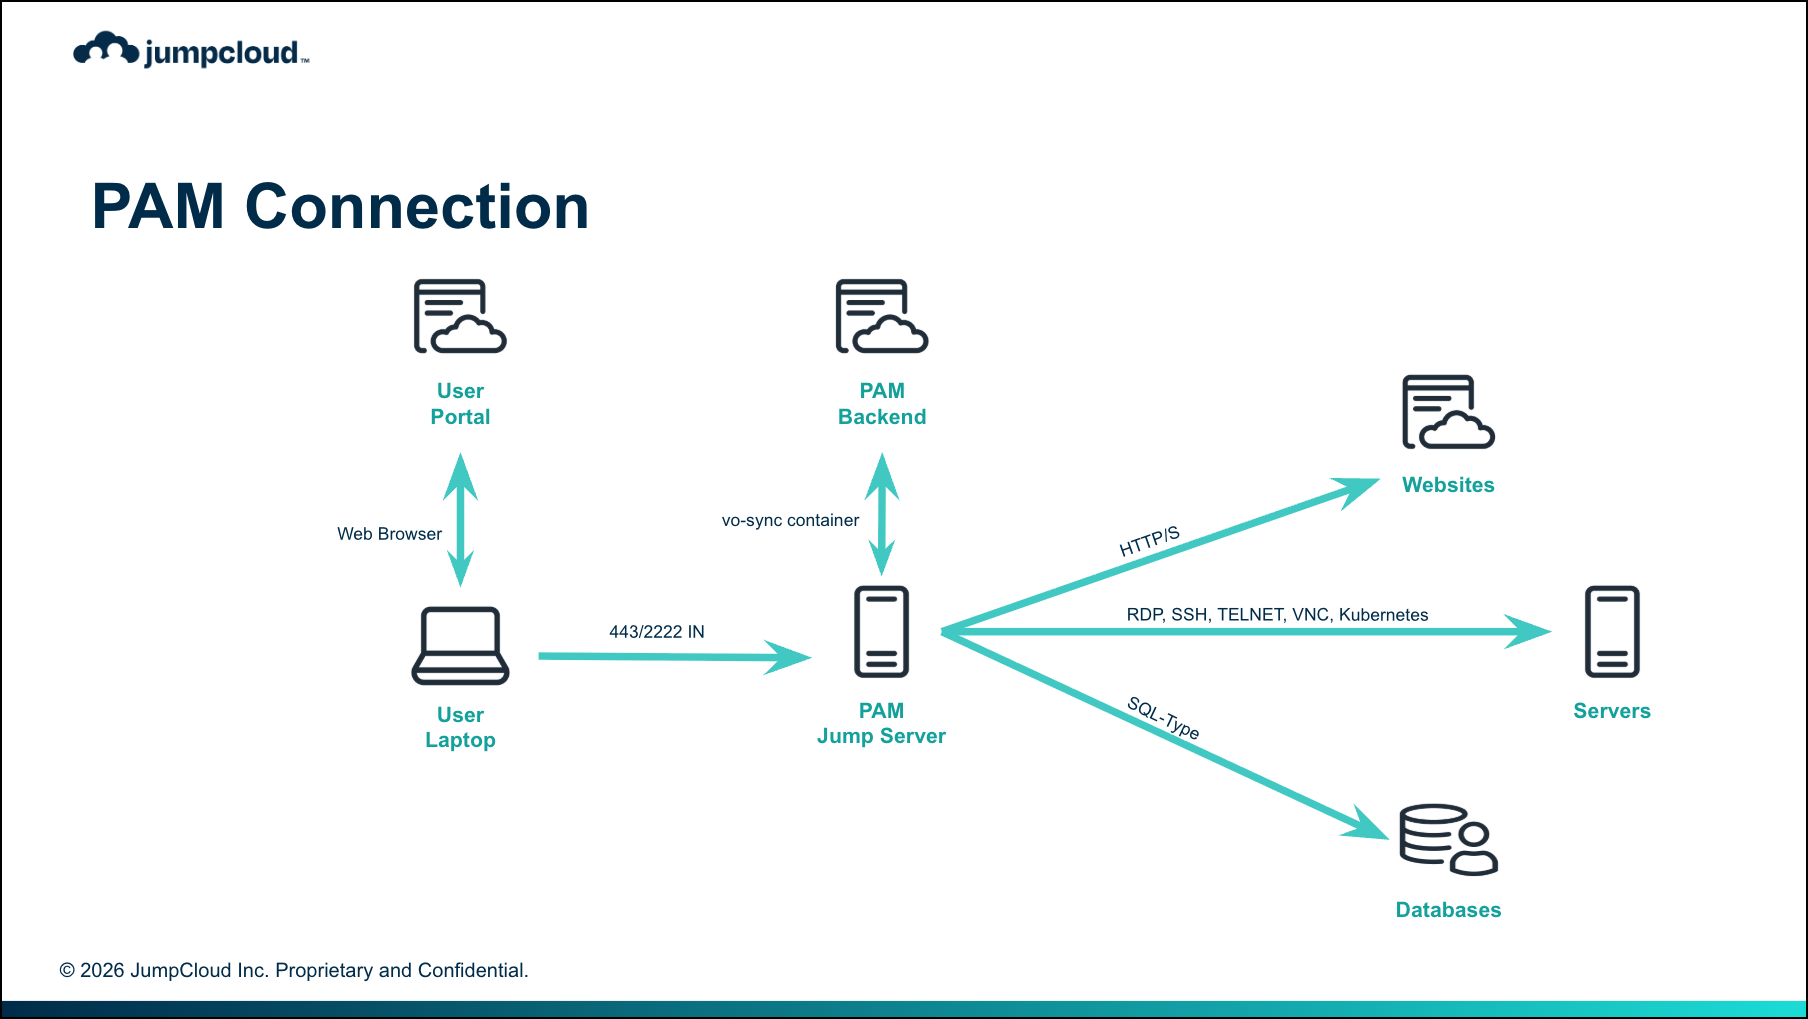
For sessions that use a Jump Server, think in three communication legs:
- User endpoint to Jump Server: the user reaches the Jump Server for the session.
- Jump Server and JumpCloud PAM Platform: authentication, credentials, and session commands.
- Jump Server to target resource: the Jump Server reaches the Server, Database, or Web Shield website.
The JumpCloud Admin Portal and JumpCloud User Portal orchestrate access. They are not an intermediate hop in the middle of session connections.
You need a Jump Server with status Online for Servers, Databases, and Privileged Websites with Web Shield. Privileged Websites without Web Shield use JumpCloud Go in the user's browser and do not use the Jump Server for that session path.
Reviewing Host and Software Requirements
Complete these requirements before you register or install a Jump Server.
Prepare one Linux host that will run the Jump Server containers. Install Docker on that host first. The Jump Server install file expects Docker to already be running.
| Requirement | Details |
|---|---|
| Operating system (OS) | Ubuntu Server 24.04 |
| Container runtime | Docker installed and running before you execute the Jump Server install file |
| Privileges | Root on the host (sudo su or equivalent). The install must run as root. |
| CPU | At least 2 vCPUs |
| Memory | At least 8 GB RAM |
| Disk | At least 80 GB free on /. Provision more than 80 GB total so the OS and system files still leave 80 GB free on /. |
| Tools | curl available on the host |
| Clock sync | Host clock drift under 300 seconds versus JumpCloud server time |
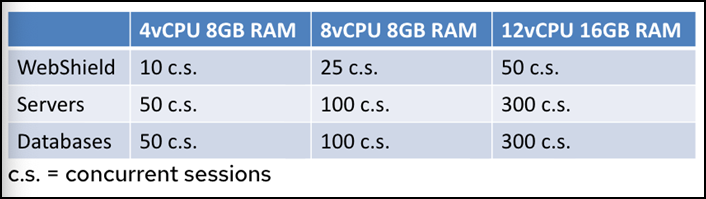
As your environment grows, you can update the hardware of your Jump Server so users get improved session quality based on the amount of concurrent sessions.
Reviewing Network Requirements
The Jump Server host needs both inbound access (so users and browsers can reach it) and outbound access (so it can connect to JumpCloud and to your target resources).
Inbound to the Jump Server Host
Users reach the Jump Server on the ports you configure when you add it in the Admin Portal. Defaults are shown below. Change them in Add Jump Server only if you must avoid conflicts with other services on the same host.
| Port | Default | Used for |
|---|---|---|
| Web Port | 443 | Browser-based privileged sessions |
| Shell Port | 2222 | Direct Access paths that use the shell port |
Your firewall or security group must allow inbound connections to those ports from the networks where users connect (for example office, VPN, or ZTNA).
Outbound from the Jump Server Host
Outbound connections have two destinations:
- JumpCloud PAM Platform and related cloud services for your data center (tables below). Most entries use port 443. The message queue uses port 5671.
- Your target resources, over the protocols you will use (for example SSH, RDP, Telnet, VNC, Kubernetes, and database protocols).
Allowing all outbound connections on port 443 is not sufficient. The AWS MQ broker entry uses port 5671, not 443. If that allow list entry is omitted, the Jump Server may install and report Online while some live Platform commands fail later (for example force disconnect during a Live session).
Outbound Allow List by Data Center
Allow the Jump Server host to reach every address in the table for your JumpCloud data center region.
US Data Center
| Address | Port | Purpose |
|---|---|---|
*.vault.jumpcloud.com | 443 | PAM Platform communication |
*.api.vault.jumpcloud.com | 443 | PAM API |
*.app.vault.jumpcloud.com | 443 | PAM application endpoints |
*.connect.vault.jumpcloud.com | 443 | Jump Server connection domain |
b-4e73f8f9-5209-4e31-b0e9-b53a88287a70.mq.us-east-1.on.aws | 5671 | Live Platform commands (AWS MQ) |
public.ecr.aws | 443 | Pull Jump Server container images |
*.cloudfront.net | 443 | Session recording upload (CDN) |
*.s3.us-east-1.amazonaws.com | 443 | Session recording storage |
clients2.google.com | 443 | JumpCloud Go install inside Web Shield sessions |
EU Data Center
| Address | Port | Purpose |
|---|---|---|
*.vault.eu.jumpcloud.com | 443 | PAM Platform communication |
*.api.vault.eu.jumpcloud.com | 443 | PAM API |
*.app.vault.eu.jumpcloud.com | 443 | PAM application endpoints |
*.connect.vault.eu.jumpcloud.com | 443 | Jump Server connection domain |
b-1b7a56b2-c4ea-4ef3-bfaa-f7a46f806487.mq.eu-central-1.on.aws | 5671 | Live Platform commands (AWS MQ) |
public.ecr.aws | 443 | Pull Jump Server container images |
*.cloudfront.net | 443 | Session recording upload (CDN) |
*.s3.eu-central-1.amazonaws.com | 443 | Session recording storage |
clients2.google.com | 443 | JumpCloud Go install inside Web Shield sessions |
India Data Center
| Address | Port | Purpose |
|---|---|---|
*.vault.in.jumpcloud.com | 443 | PAM Platform communication |
*.api.vault.in.jumpcloud.com | 443 | PAM API |
*.app.vault.in.jumpcloud.com | 443 | PAM application endpoints |
*.connect.vault.in.jumpcloud.com | 443 | Jump Server connection domain |
b-3e2a9040-3eeb-46ae-b7c4-918bf4c69efb.mq.ap-south-1.on.aws | 5671 | Live Platform commands (AWS MQ) |
public.ecr.aws | 443 | Pull Jump Server container images |
*.cloudfront.net | 443 | Session recording upload (CDN) |
*.s3.ap-south-1.amazonaws.com | 443 | Session recording storage |
clients2.google.com | 443 | JumpCloud Go install inside Web Shield sessions |
The clients2.google.com endpoint is used when a Web Shield session installs JumpCloud Go inside the Web Shield browser. Privileged Websites without Web Shield use JumpCloud Go in the user's own browser and do not need this outbound path from the Jump Server.
Registering a Jump Server in the Admin Portal
Installation has two stages. First register the Jump Server in the JumpCloud Admin Portal. Then install the software on the Linux host using the downloadable install file.
- Log in to the JumpCloud Admin Portal.
- Go to Access > PAM.
- Click the Jump Servers tab.
- Click Add Jump Server.
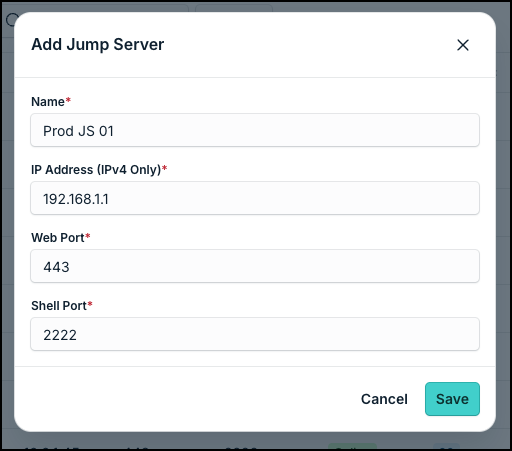
- In the Add Jump Server dialog, complete the fields below, then click Save.
| Field | What to enter |
|---|---|
| Name | A clear name for this Jump Server |
| IP Address (IPv4 Only) | IPv4 address of the Linux host |
| Web Port | Browser session port. Default is 443. |
| Shell Port | Shell / Direct Access port. Default is 2222. |
The new Jump Server appears in the list. Until you install it on the host, status is typically Not Installed.
Opening Install Jump Server
- On the Jump Servers list, find the Jump Server you registered.
- In Actions, click Install Jump Server (install icon / tooltip Install Jump Server).
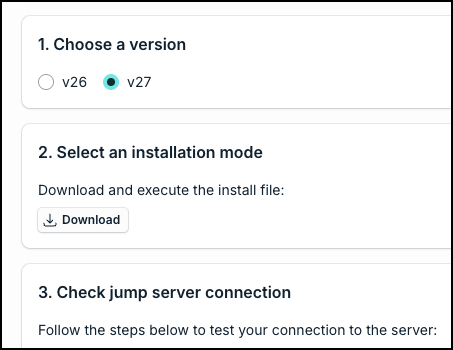
- The Install Jump Server page opens with three steps.
| Step | Label on the page | What you do |
|---|---|---|
| 1 | 1. Choose a version | Select the Jump Server version to install. Select the newest version available. |
| 2 | 2. Select an installation mode | Download the install file |
| 3 | 3. Check jump server connection | Test reachability after install |
Choosing a Version and Downloading the Install File
- Under 1. Choose a version, select the Jump Server version to install (for example v26 or v27).
- Under 2. Select an installation mode, find Download and execute the install file:
- Click Download.
The Admin Portal downloads an install file to your local machine. That file is a script of install commands. You must place it on the Linux host where the Jump Server will run, then execute it there as root.
Installing or reinstalling a Jump Server can take about 10 to 20 minutes. Privileged access through that Jump Server is unavailable while the install runs.
Putting the Install File on the Jump Server Host
The install file starts on your workstation after Download. The Linux host must have a copy of that file before you can run it. Use any secure method that works in your environment.
| Option | When to use it | How |
|---|---|---|
| A. File transfer | You can copy files from your workstation to the host (SCP, SFTP, or another approved tool) | Transfer the downloaded install file to a directory on the Linux host, then continue in that directory. |
| B. Copy and paste | File transfer is unavailable, or you prefer to recreate the script on the host | Open the downloaded file in a text editor on your workstation, copy all content, then on the host create the file with an editor such as nano, paste, and save. |
Option A: Transfer the Downloaded File
- Copy the downloaded install file from your workstation to the Linux host.
- On the Linux host, go to the directory where you placed the file.
Option B: Copy and Paste with a Text Editor (for example nano)
Because the install file is text, you can recreate it on the host without a binary transfer:
- On your workstation, open the downloaded install file in a text editor.
- Select all content and copy it.
- On the Linux host, open an editor, for example:
nano <install-file>
- Paste the full script, save, and exit the editor.
Running the Install File as Root
Run these commands on the Linux host. Replace <install-file> with the real filename you downloaded or created.
- Switch to root:
sudo su
- Make the install file executable:
chmod +x <install-file>
- Run the install file:
./<install-file>
Stay on the host until the installer finishes. The installer pulls container images, creates the Jump Server containers, and registers the host with JumpCloud PAM.
Do not manually remove Docker volumes as part of a normal install or update. That can destroy local session recordings that are not yet uploaded, SSH keys used by the Jump Server, and certificates. Use the install file from the Admin Portal for install and reinstall. Manual volume removal is for troubleshooting only when other options fail.
Checking Jump Server Connection
After the install finishes on the host, return to the Install Jump Server page in the JumpCloud Admin Portal and complete 3. Check jump server connection.
- Review the on-screen steps under 3. Check jump server connection.
- Click Check Connection.
- A new browser tab opens to run the test.
- Compare the result to the outcomes below.
| Result | What you see | What to do |
|---|---|---|
| Success | A message such as This server can only be accessed from the application. | You can close the new tab and continue to verification. |
| Failure | The page does not load, or the browser shows an error such as This site can't be reached | Correct network, DNS, TLS, or firewall issues for the Jump Server Web Port path, then click Check Connection again. |

Verifying the Installation
Confirm success in the Admin Portal and on the Linux host.
In the JumpCloud Admin Portal
- Go to Access > PAM > Jump Servers.
- Confirm the Jump Server shows an installed version and status Online.
- (Optional) Open Health Check from Actions if you need metrics and status detail.
On the Linux Host
Run:
docker ps -a
Confirm the Jump Server containers are present and show Up.
| Container | Role |
|---|---|
| vo-core | Session engine and recording for many session types |
| vo-web | Web entry point for browser sessions |
| vo-sync | Sync, backups, and Platform commands |
| vo-bastion | Direct Access / shell port path |
| vo-database | Database session path |

Quick Reminder
| Step | Where | What you do |
|---|---|---|
| Register | Jump Servers > Add Jump Server | Name, IPv4, Web Port, Shell Port |
| Download | Install Jump Server | Choose version, select Download |
| Transfer or paste | Your workstation to Linux host | File transfer, or copy into nano (or similar) |
| Execute | Linux host as root | chmod +x then run the install file |
| Verify | Admin Portal and host | Check Connection, status Online, docker ps -a |
Was this information helpful?